Bocksten Man Shoes – Reproduction Project
Originally posted to the forum in 2014
Research
I need some new simple shoes. Hopefully my enthusiasm will hold for a new fancy pair of shoes next. I’ve picked the Bocksten Man’s shoes.
In a first for me, the best picture I can find of the original sole is via Pinterest! https://www.pinterest.com/pin/467107792572008922/ https://www.flickr.com/photos/dekayne/21 … 745473676/
There are some small photos on the Bocksten Man museum page http://www.hkm.varberg.se/bockstensmannen/kladerna/
Marc Carlson has a page which omits the shoe sole shape: https://www.personal.utulsa.edu/~marc-ca … SHOE62.HTM
I found a copy of the leatherwork sections of Nockert’s Bockstenmannen book on one of my yahoo groups
I re-read William de Wyke’s tutorial on closing uppers before embarking on the job: https://wherearetheelves.net/wp-content/ … losing.pdf
Heel stiffener stitching article: https://aands.org/raisedheels/Techniques/stiffener.php
Making the pattern
Materials
- Thick cardboard
Pencil
Cardboard scissors
Plastic bag
Masking tape
Stand on cardboard with weight on one foot.
Draw around the contact points of the foot with the pencil.
Now take cardboard and draw a shoe shape around the contact points
And now cut out the shape.
Because these are pointing shoes, we need to add some packing at the top of the shoe for when we pattern the uppers.
Standing on the sole pattern, wrap a plastic bag around the foot and masking tape it so that all the plastic is covered.
Now take a texter and mark the shape of the shoe including the shoe split.
Now cut yourself out of the shoe. Notch the uppers and the sole so when they are cut out they can be matched back up.
Take the cut out upper and make a cardboard copy. Now we add a bit just to the seam that attaches to the sole. (About a cm)
Cut it out with the added allowance.
Construction
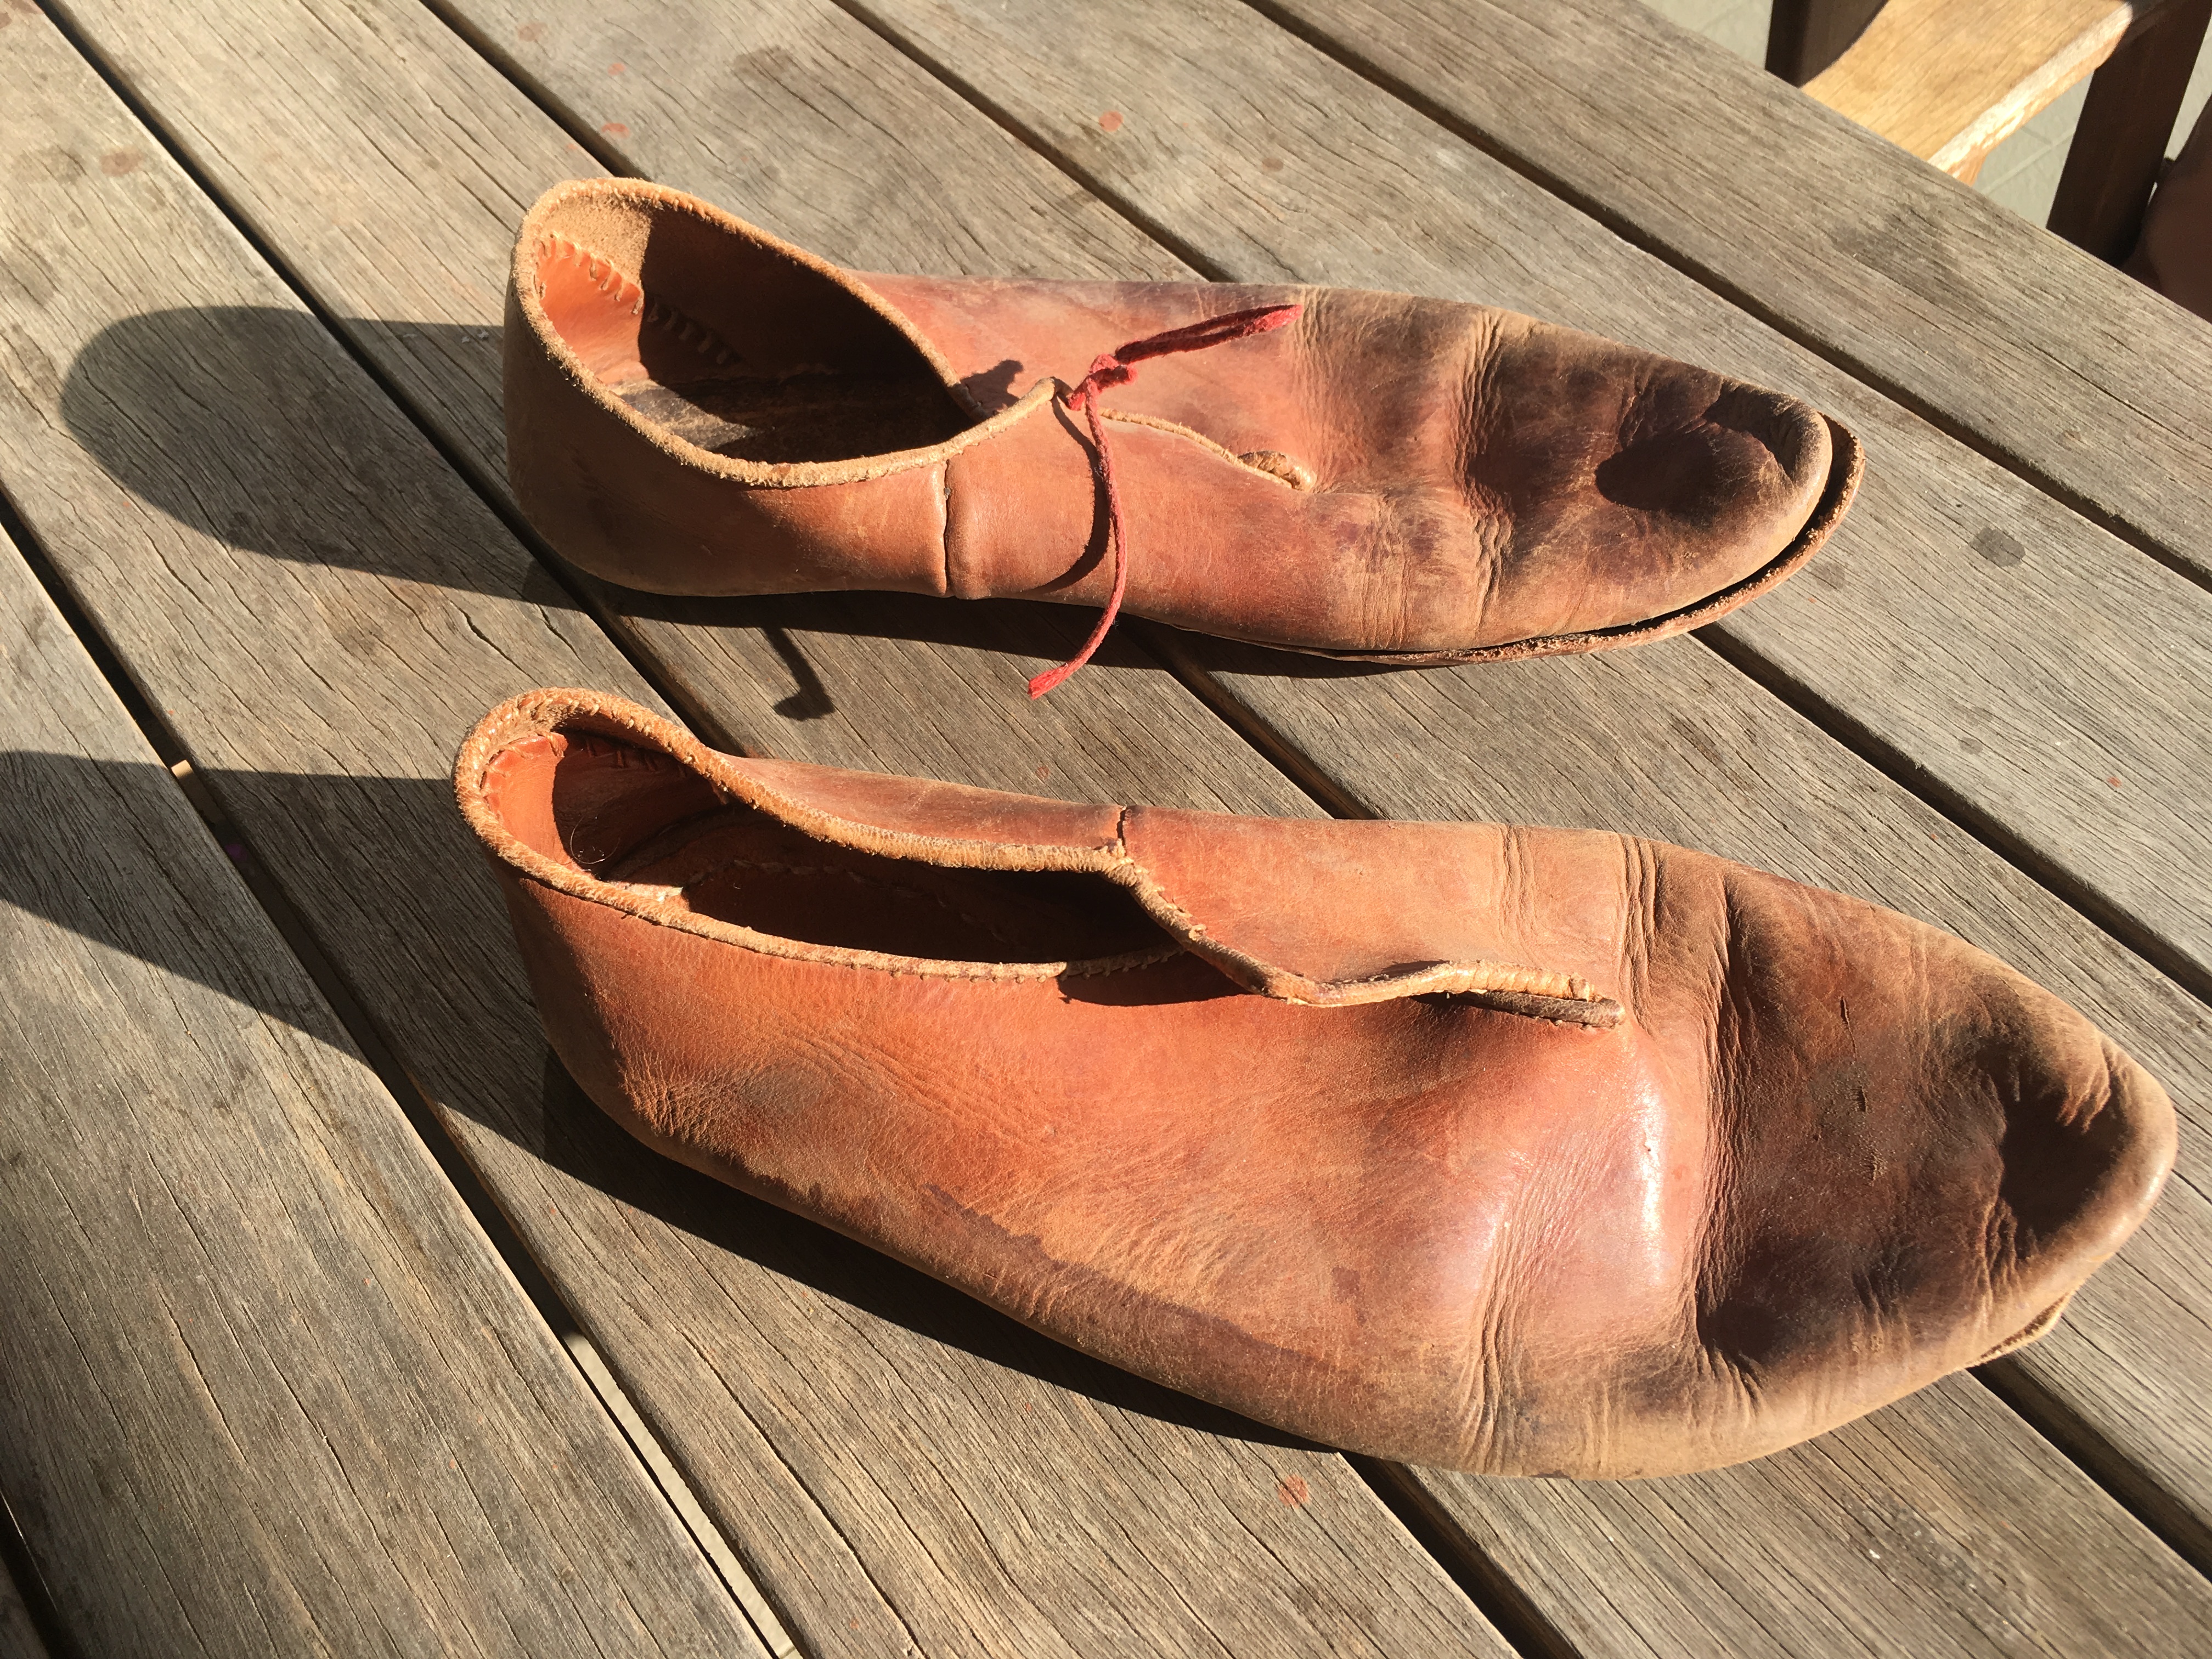
Close up of the single seam closing the upper, as well as the heel stiffener. It’s probably evident that I really struggled to sew down the stiffener, but learnt a lot in the process.

Sole seam before turning. In a moment of madness I finished one set of threads by tying around the seam. Given that I expect this material to compress during turning and wear, this is mechanically a dumb thing to do as well as being potentially uncomfortable.

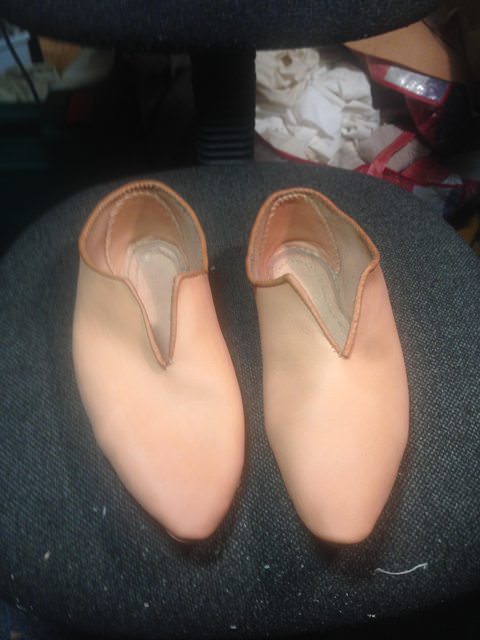
Freshly turned shoes. So clean and with a rather conical shape. Both of these things changed quickly in contact with the earth.

Worn in after 5 days. I’ve also rubbed in about 6 coats of tallow with gentle heat and added a fingerloop braided linen lace waxed with beeswax to each shoe as a closure. I could have used a leather thong like the original but I was feeling pretty. 😉

This is the worst of the gapping in the sole seam at the inside beside the ball of the foot. I worked hard to keep the stitches tight but perhaps it’s possible that could be tighter, esp with a narrow hold in the sole. (less thread in the stitch, less able to work loose?) Perhaps a welt is needed to prevent any gapping? I will also try increasing the pitch of the stitches at these high-strain areas next time.

The sole is 3.5-4mm veg tan
The upper is 1.5-2mm veg tan
The top band is a 9mm strip of deer hide (0.75mm).
The threads were 3 plies of linen for the heel stiffener and uppers, a fairly fine 4 ply pre-plied thread for the top band and 6 plies of linen for the sole.
All threads were waxed with Hugh’s blonde coad and the taws threaded to saddler’s needles and wound back. I tried some Stolhman techniques for bristle to no end but frustration. Next time.
The steps I took were as follows:
- Sew the heel stiffener to the upper with tunnel stitch
- Closed the uppers
- Sew the top band to the upper, facing grain to grain with a whip stitch, flesh-grain through both layers.
- Sew the other edge of the top band to the upper, rolled in and whipped flesh-edge through the upper and flesh-grain through the band.
- (In fact, I sewed as much as I could of the top bands with the uppers flat, then closed and finished the top band. I found it much easier to work with the flat uppers, even with a closing block and stirrup.)
- Stitched the uppers to the soles.
- Turn, grease, lace and wear.
Learnings:
- Awl taper is really important. My cheap fine awl became much more capable once I reground it from taper over 5mm to taper over 15mm and re-polished
- A round knife is much better at clicking (cutting) out shoe soles than a snap off razor.
- Beeswax on the taws after threading the needle is really worthwhile. Likewise beeswax on the awl for long stitch tunnels.
- These shoes could be turned after only a few seconds submerged. Previously I’ve soaked the shoes for half an hour, which I don’t think is good for the tannins/oils in the leather.
- Closing block and stirrup work better on a low seat than a high one.
- First attempt at a heel stiffener and top band. Heel stiffener seems like it will improve the life of the shoe worth the cost of sewing. The top band, while it gives a nice finished look, is a time consuming fiddle to put on. I only went through with it for the sake of a true reconstruction.
Feedback
William/Al of Where Are The Elves above had the following to say over on Facebook:
Hi Elden. Those are good looking shoes. The wear patterns they’re establishing look about right. I’m glad you used my round closing document – if you have any suggestions for how it could be improved I’d love to hear them. I’ll start out by saying that’s a good pair of shoes. I’m about to give you a few suggestions for the next pair, but there are *always* suggestions for the next pair.
Reading your forum post about them you had some good learnings. You’re right about low seats. It’s also traditional to have a footing block under your heel when you’re using a stirrup. I find a chunk of 100×100 square fence post works well. Your closing looks pretty good. I recommend scribing a line with a thumbnail parallel to each edge to guide your awl placement. That helped me tidy up my closing seams no end. Use your index finger as a ‘fence’ to set the distance in from the edge. It doesn’t always guarantee a straight seam (only practice can do that) but it does help.I can’t see how you finished your closing seam, but I don’t bother. I just sew from the top down and let the sole seam hold it together.
I think the best way to finish the sole seam is to back stitch three or four stitches through holes you make half-way between the existing ones. With code hand wax it’ll lock up solid and you won’t have any problems with it coming out.
The heel stiffeners look pretty good. They’re wide enough, which is something I screwed up on my first few pairs of shoes. The whip stitching looks fine. Personally I do mine slightly differently to Francis, I use a straight awl and go in the stiffener and out the upper. I also skive the edges of my stiffeners. I don’t know whether they did that on medieval shoes but I find it helps both the sewing and the finish.
Top bands are just time consuming, but it looks like you did a good job with that one.I’d suggest putting a welt in the next pair. Ignore what Shoes and Pattens says about them, they weren’t triangular in section. They just get that way in wear. I just sew a strip in about 10cm wide and trim it if necessary afterwards. Tallow is good. Tallow + cod liver oil is better.
The gapping in the sole seam has two causes. The first is that the stitches are slightly too long, as you’ve noted. I tend to aim for ~6mm stitches in the sole seam, depending on the weight of leather. I use five to nine threads for sole seams.The second cause is the harness needles. It’s basically impossible IMO to sew a properly tight sole seam with them, even using tapered threads a-la Stohlman.Bristles are best and Francis sells them, but if you can’t do bristles get some steel guitar string, cut it into quarters, fold each quarter in half and solder it together tidily for most of its length, leaving an eye at the fold. Use them in pairs like long thin needles.They’re a bit unforgiving of technique since if you pull them too much instead of pulling on the thread they’ll cut through your taper, but they’ll go through much smaller holes than harness needles will. You want a hole that’s slightly *smaller* than two thread thicknesses so they’re completely filled by the thread.I used to rub beeswax on the tapers too, now I just rub them on my face above my eyebrows or on the side of my nose and get a little bit of skin oil on the taper. It works much better. I only do this with bristles though, with needles or guitar string ‘bristles’ I don’t cover the code so that if I do pop one off I can more easily re-attach it.I use two awls, a teeny tiny one for closing (see my blog post https://wherearetheelves.net/fine-closing-awl) and a bigger one for sole seams. Even the bigger one for sole seams is only about 3mm wide at the widest. I’ll measure it properly when I can get to it again.
My usual assembly order is:
Close upper
Heel stiffener
Reinforcing cords
Top band
Sole
TurnI close completely before putting the heel stiffener on so I can be sure I get it centred. This is less of an issue with two-part patterns.Anyway, yeah, good shoes. I look forward to seeing the next pair!
I do have a heel block, but heel block and modern swivel chair left me hunched way over to get to my work and with difficulty getting the stirrup tight. Lower seat fixed it all right up.
I’ll give the welt a go and more stitches. I was looking at the triangular welt thing on Marc’s site again recently the other day and trying to imagine the person who skived welts into a triangle all day. It seems much more likely that it was compressed to a triangular profile by wear, as you suggest.
I’ll certainly give scribed lines a go on the closing seam. I used them on the sole seam to good effect. The nearer row of somewhat crooked stitches is the exit wounds, which is the less consistent side, FWIW. I had trouble with one seam where it was increasingly difficult to not dig too deeply. The stitch holes migrated to the corner of the grain and eventually into the grain as the seam sort of ate the material and rolled it progressively up into the path of the awl. I did my best to gauge the depth as always, but once I let it get out of control it was too shallow an angle between the closing block face, the entry hole and the curled leather in the seam to get the depth right. All of that probably reads dramatically but in reality by the end of the seam the stitches were marginally flesh-grain and the seam was hard to push smooth. I think more discipline, more consistently might help, and maybe less hurry in stitching. As I think your article suggests, I sewed top-band to sole and let the sole seam finish the job. I tacked it with a bulky knot to stop it coming loose while I fitted the sole, then clipped off the knot before turning.
Sole seam I tried your mid-pitch backstitch, which worked well. It was just the first thread I was kind of on autopilot, tied the threads off and clipped them before I realised what I’d done.
Re bristles, wire needles sound interesting. I don’t solder too neatly but I might give it a go. I have a couple of dozen bristles that Ana in Wales was kind enough to send me, but I am yet to master attaching the thread smoothly and securely. So far I have been able to do only one or the other. Secure bristles snap for want of smoothness. Smooth bristles slide apart. I think I might need to build a longer taper than I can get away with on needles.
To align the heel stiffener I used a mark on the upper made during patterning. You might well be making life easier for yourself with a curve in the upper though. I had a lot of tear throughs and awls emerging where I didn’t want them in the process. Mostly nerve wracking with the finger-puncturing awl tear-throughs. There’s a good amount of blood in them there shoes.
I’ll look into cod liver oil. Do you blend it with the tallow before applying? I had briefly discussed with Hugh the notion of mixing tallow with wax for a longer lasting coating but neither of us have bothered yet, especially without any research to suggest we should.
I have a cheap little awl I bought for closing but the blade turned out to be an old needle with a snapped eye. I cut the tip into more of a chisel shape on fine emery, but it was too abrupt a taper. I used your drill-vs-dremel technique to make the taper more gradual and re-polished with emery and then strop. Tears less leather and less of me in the process.
Postscript:
4 years later, I’ve patched these shoes and completely re-soled one, but they’re still going!
I put William’s tips into action for the re-soling, and they turned out better than new.